How to Create Labels in Gmail (in English)
How to Create Labels in Gmail (in English)
If you use Gmail. So you must have noticed that many unnecessary emails keep coming in your Gmail Account. This includes many promotional emails, some related to your Social Media Accounts. In such a situation, the problem comes in front of you that how do you check your important e-mail?
Google has given a setting to check important emails of Gmail. Which is called Label. For this you have to work hard once. Once you have created and set the Label for your Gmail. So Google displays your important emails in the Label you have created.
This way you can easily check your important Emails. So in this article of "Jeevan Bima Bazaar" we will know how to create Label in Gmail?
What is Label in Gmail?
If you are a computer user, then surely you must have created folders in your computer to keep different types of files safe. In different folders, you will save different types of files according to your need.
Labels also work in a similar way to Gmail. You must have given your Gmail ID in your Service Profile, in your Bank Account, in the Income Tax Department. That is, your Gmail ID is given in many important places and your Employer, Bank, Income Tax Department or any other important person gives you email, which is very important for you.
Now apart from this, your Customers and your friends can also know your Gmail ID. It is also possible that you have registered your email in your Social Media Account.
That is, you get many types of emails on your Gmail. There may be some that are very important to you, there may be others that you don't like. So in Gmail, you can create folders like a computer and keep emails in different folders according to your need.
Such folders created for Gmail are called Label. When creating a Label on Gmail, some settings have to be made. As soon as you set this setting, the email you receive in Label according to your setting. The advantage of this is that you do not miss your important emails.
How to Create Labels in Gmail?
Creating a Label in Gmail is quite easy. So let's understand step by step How you can Create a Label according to your need in Gmail?
01. First of all open your Gmail account.
02. Now check the below image by matching it with your Gmail Dashboard. Options like Inbox, Starred, Snoozed, Sent, Drafts, Important, Chats, Spam will appear in the dashboard of Gmail. You can see all of these options or you can see less of them. All these options that you are seeing at the moment, this is the default Label of Gmail.
03. Now you will also see the option of More. You have to click on it.
04. After clicking on More option you will see a box. In which you have to write the name of your Label. You can type in the name of your Label as you wish, after typing the name of the Label, click the "Create" button at the bottom right of the box. Look carefully at the image given below-
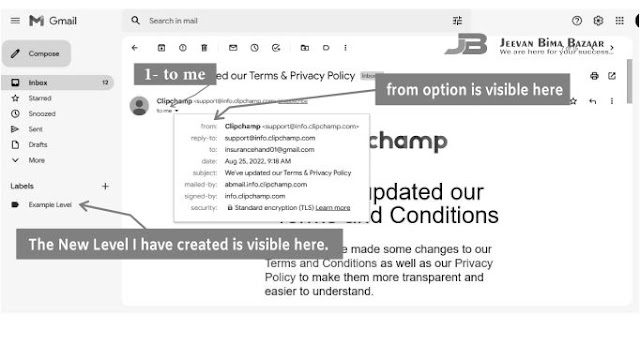
05. After following the above option, you will find that a New Label will be created in the left side of the Gmail dashboard. I have created a New Label named "Example Label". Which is shown in the next image.
If your browser doesn't show the Label as in the next image, click the "More" option. By doing this, the new Label that you have created will be visible.
How to Get Important Emails in Label -
After creating a Label, it is an important step to get the emails you need at your Label only. So for this you have to do the following setting for your Gmail. It can be a bit tricky, but with practice you will be able to do it easily.
Follow the steps given below in a sequential manner to receive important emails in Label. We would suggest that you understand it once and then practice. If there is any confusion while practicing then read the article.
01. First of all open the email from your inbox which you want to divert to your Label.
02. Now look carefully at the image given below. You'll see a small arrow next to "to me." You have to click on this arrow. When clicked a box will show the details of the email. Note the box in the image below - "from: Clipchamp (support@info.clipchamp.com)" is visible. From this we have to copy @info.clipchamp.com. Similarly, you follow up for your email.
03. Now that you have copied the link from @ to last as per above method. Then click anywhere in the Email Body of the mail to close this box. Now take a look at the tool shown at the top of the email. You will see three dots at the end or you will get More option. You have to click on it.
04. On clicking on the three dots some new options will appear. From this you have to click on "Filter Message like these" option. If you are having trouble understanding then look at the image below carefully.
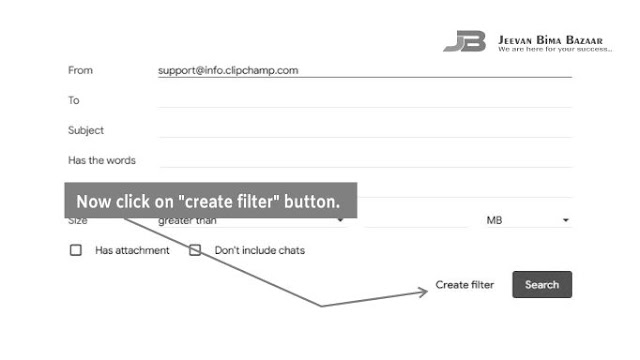
05. Now a box will open in front of you again. You'll see a "Create Filter" button in the bottom right of this box. You click on this button. See the image below for help.
06. Now once again you will see a new box. You have to select Skip to inbox (Archive it), Apply to Label, Also Apply filter to 1 matching conversations option in this new box. Now select the Label you have created from the Apply to Label option.
07. Now click on the Create Filter button at the bottom of the box. If you are facing difficulty in doing this task then have a look at the below picture carefully.
Learn how to make Label for Gmail easily-
We believe that with the help of the above article, you will be able to easily create a Label in Gmail. But if you are still having trouble in making the Label then we are presenting a video for you. Watch this video carefully. Because in this video live it has been told that how Label can be created for Gmail?
Some other important Articles useful for you-
If you want to use Gmail professionally or personally. So you should also read other articles published on "Jeevan Bima Bazaar". Here's detailed information so you can get an idea of what a tool in Gmail means, what are its benefits and how to use it?


